December 01, 2012

Inserting Video into Google Sites Pages

There are a number of ways that you can you add videos to your Google site: use a simple hyperlink to an external page that includes the video (e.g. Vimeo), insert a YouTube video, and insert a Google Docs video. Let's take a look at the last two. 

YouTube

You can easily search for and insert YouTube videos into your Google site by embedding the video into a page. If you plan to create your own YouTube video the limit is 15 minutes by default.  (For steps on how to increase this limit go to http://support.google.com/youtube/bin/answer.py?hl=en&answer=71673 .)
  • For example. Go to http://youtube.com and type Murchison Falls National Park, Uganda in the Search box. 
  • Click on the video thumbnail to open the YouTube page.
  • Copy the web address: http://www.youtube.com/watch?v=NVaPr1zu3lE.
  • Open your Google Sites page and click where you want to embed the video.
  • Choose Insert > Video > YouTube.
  • Paste the web address into the URL box. Check Include border. Check Include title and enter a descriptive name if you wish to title the video.
  • Click the Save button to insert the video.
  • Click to insert the cursor to the right of the video.
  • You should always attribute your source. Press the return or enter key and then choose Edit > Paste to insert the originating URL of the YouTube video.
http://www.youtube.com/watch?v=NVaPr1zu3lE
    Google Drive Videos
      Uploading Your Recording to Google Drive

      You can upload video recordings to your Google Drive and then insert the video into a Google Sites page. For more information refer to Video Files in Google Drive. There are a number of advantages that Google Drive videos have over YouTube. With a Drive quota of up to 30GB it is possible to upload longer videos such as 45 minutes in length, although compressed .mp4 is recommended before uploading. Google Drive sync allows organization of videos in the Google Drive folder on your computer, which are then updated in your Drive share on Google's servers. Videos in Google Drive can be shared with groups and users in your domain when public viewing is not preferred. 
      • Log on to Gmail with your Google Apps account. 
      • Click the Drive link in the top left menu bar to display the Google Drive home page with a directory of any files you may have. 
      • To the right of the RED Create button click the Upload button and choose Files. (Depending on your browser you may also use Drag and Drop as shown in the Appendix.)
      • Locate your video file and click the Open button. 
      • You will be prompted to Upload your video. Keep the default settings: Convert documents and Confirm settings before each upload.   


      • Click the Start upload button. 
      Waiting for your Video Upload
      • Wait patiently. A video can take several minutes to upload, depending on file size. The upload time for a 15 minute video may take up to 60 minutes depending on Internet bandwidth.  
      The bottom strip displays the status of your Google Docs storage
       Share Your Video 

      It may take several minutes for the uploaded video to render and be available for playing.
      • Click the video to open it into Preview mode. 
      • Click the blue Open button in the lower right corner of the screen to display your video (e.g. screen_reader.mp4) with the Google Drive player. 
      • Click the blue Share button. If you want your Google Drive videos to display on your Google Sites web site for viewing on the Internet, clickChange ... then choose Public on the Web. 
      • Click the Save button.
      • Click Done. 
      Embed Your Video

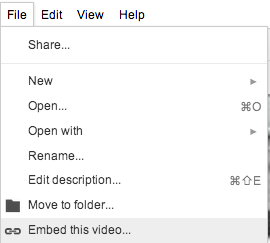
      Use Embed this video to allow playback of your Google Drive videos on mobile devices.
      • Choose File > Embed Video. 

      • Click in the box to select the HTML code and then from your browser menu choose Edit > Copy. 

      • Click OK.
      • Click in your Google Sites page where you want the video to display.
      • Choose Insert > More gadgets ... and type embed in the Search box. 
      • Select to select the Embed gadget and then click the blue Select button. 
      • Click in the Embedding snippet box and from your browser menu choose Edit > Paste. You can edit the width and height but make them proportional to the original. 

      • Scroll to the bottom of the gadget window and enter the Width and Height to match the dimensions of your video. 
      • As an option check Include a border around gadget and Display title on gadget, entering a descriptive name. 

      • Click the OK button to insert the gadget. You will need to click the Google Sites blue Save button at the top to save the page changes and display the embedded video. Note that this video will also play on mobile devices. Below is a sample video. 


      Appendix

      Upload Your Recording to Google Docs – Drag and Drop 

      If your browser is Firefox, Safari, or Firefox, then try Drag and Drop as an alternative to uploading your video to Google Docs.
      • Log on to Gmail with your Google Apps account. 
      • Click the Documents link in the top left menu bar. 
      • Locate your video in the Videos folder. Drag your video to your Google Drive window.  
      • You will be prompted to Upload your video. Keep the default settings: Convert documents and Confirm settings before each upload.  
      • Click the Start upload button.

      November 20, 2012

      Inserting Audio into Google Sites Pages

      Google does not provide a direct way to insert or embed audio into Google Sites as it does with video. Playing audio requires uploading the sound file and the use of one or two gadgets depending on your audience and the length of your audio recording. Audio can be uploaded to an external web site or uploaded as an attachment to your Google Sites page.  Next an audio player gadget is inserted, which links to the audio file's URL. The following techniques are especially useful for developers of personal e-portfolios to add evidence of their learning through audio recordings. 

      Scenario 1: Google Audio Player (Flash)

      Advantage: loads and plays audio quickly and plays consistently across all browsers
      Disadvantage: Flash player that will not work on most mobile devices such as an iPad or iPhone.  
      • Create or go to the web page where you will insert the audio.
      • At the bottom of the page click Add files and browse for the audio file.
      • Click Open to attach the file. It may take a few moments to upload depending on the file's size.
      • Refer to the figure below. Control-click (Mac) or Right-click (Windows) on the download arrow icon and choose Copy Link Address. This address will be copied to the Google Audio Player.
      • Locate the point on your page where the audio is to be embedded and choose Insert > More gadgets ...
      • Click Public in the left sidebar.
      • In the Search box type in quotes "Google Audio Player".
      • Click the Search icon to bring up the player(s). 
      • Click once to select the Use Google Audio Player to play .mp3 file.
      • Next click the BLUE Select button to bring up the gadget settings.
      • Click in the mp3 files to play box and remove the entire URL.
      • Click in this now empty box. Right-click (Windows) or Control-click (Mac) and choose Paste. This will paste the address that you copied from your audio attachment. 
      • Backspace out the ?attredirects string of text up to the audio file suffix (e.g. mp3). See below for an example. The part to erase is crossed out. 
      https://sites.google.com/a/elmira.edu/it/gapps
      /gsites/sitesaudio/nzoku_reading.mp3?attredirects=0&d=1
      • Apply settings as described on the figure below.
      • Click the OK button to apply the settings. To play examples click the link below.  
      Examples of audio inserted into Google Sites.

      Scenario 2: Embed Music (No Flash)

      Advantage: Loads quickly and plays on mobile devices.  
      Disadvantage: Larger audio files load slowly on web pages (up to 1 or 3 minutes) using Google Chrome and Firefox. 
      • Create or go to the web page where you will insert the audio.
      • At the bottom of the page click Add files and browse for the audio file.
      • Click Open to attach the file. It may take a few moments to upload depending on the file's size.
      • Refer to the figure below. Control-click (Mac) or Right-click (Windows) on the download arrow icon and choose Copy Link Address. This address will be copied to the Embed Music player.
      • Locate the point on your page where the audio is to be embedded and choose Insert > More gadgets ...
      • Click Public in the left sidebar.
      • In the Search box type in quotes "Embed Music".
      • Click the Search icon to bring up the player(s). 
      • Click once to select Embed Music
      • Next click the BLUE Select button to bring up the gadget settings.
      • Click in the mp3 files to play box and remove the entire URL.
      • Click in this now empty box. Right-click (Windows) or Control-click (Mac) and choose Paste. This will paste the address that you copied from your audio attachment. 
      • Backspace out the ?attredirects string of text up to the audio file suffix (e.g. mp3). See below for an example. The part to erase is crossed out. 
      https://sites.google.com/a/elmira.edu/it/gapps
      /gsites/sitesaudio/nzoku_reading.mp3?attredirects=0&d=1
      • Adjust settings as needed.
      • Click the OK button to apply the settings. Click the link below to play example recordings. 
      Examples of audio inserted into Google Sites

      March 18, 2012

      Peace Corps, Congo, and Polio


      The Elmira College Rotaract Club has contributed significantly to Rotary International's mission to eradicate polio and asked that I present my experiences as a Peace Corps Volunteer in the Congo and how polio has affected that country as part of the Global Eradication Initiative. Below are the Slideshare slides followed by related links that I used for general research, reading, and preparation for the presentation.

      December 11, 2011

      Presenting PowerPoint slide shows with your iPad or iPhone

      Presenting PowerPoint slide shows with your iPad or iPhone


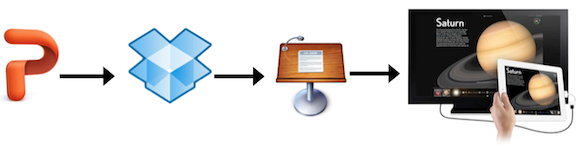
      Keynote for Macintosh is well-known for its elegance, ease-of-use, and graphical display tools but PowerPoint is still the presentation tool of choice for most users. Even though Keynote for iOS devices is the de facto presentation app, you can creative an efficient workflow using the desktop version of PowerPoint to efficiently display your slides on your iPad or iPhone (4 or 4S). Additionally, you can use your iOS device to project your presentation to a HD flat screen TV or large projection screen with a data projector.

      What you will need
      • PowerPoint for Windows or Macintosh
      • Free Dropbox account and iOS app
      • Keynote for iPhone (4 or 4S) or iPad ($9.99 for one or the other or both)
      • iOS version 5
      • VGA or HDMI adapter (optional)
      • HD TV or data projector with projection screen (optional)
      Save to Drop Box

      You will need to have a Dropbox account that is set up for synchronization with a Dropbox folder on your PC or Mac.   
      • If you have not already done so go to http://dropbox.com and set up a Drop Box account on your PC or Mac. 
      • Create a folder named PowerPoint in your computer's Dropbox folder.
      • Save your PowerPoint presentations to this folder (e.g. technology_tools_teacher.pptx), which will automatically be synchronized to your Drop Box server share. 
      Open in Keynote
      • Install the Dropbox app on your iPhone or iPad and then start the app.
      • Locate and open your PowerPoint into Dropbox, which displays the slides in one page but does not index nor display them separately. 
      • Click the curved Open In icon in the upper right corner of the Dropbox screen and choose Keynote.
      • Wait until Keynote loads - ignore any font substitution warnings.

      If you plan to make changes to your PowerPoint, then you will need to re-import the file into Keynote.

      Sychronize with iCloud and other iOS devices

      You can also synchronize your Keynote presentations with other iOS devices. For example, you could import all your PowerPoints into Keynote for iPad and then sync them with your iPhone. 

      • For your iPac choose Settings > iCloud and add your Apple ID (typical iTunes account) and password.
      • Choose Documents & Data and turn the setting to ON.
      • Choose Settings > Keynote and turn the setting Use iCloud to ON.
        Present from your iPad or iPhone

        With an iPad, iPad 2, iPhone 4 or 4S you can project your Keynote presentation to an HD TV using an Apple Digital AV adapter or to a data projector with an Apple VGA adapter. Only the iPad 2 and iPhone 4S support mirroring whatever is on the screen. However, when you press the Keynote Play button, the slides will also display on a HD TV or projection screen for an iPhone 4 or iPad 1.

          November 26, 2011

          Annotating iPad Screenshots

          Annotating iPad Screenshots

          There are a number of desktop screen capturing and annotation tools such as Jing (Mac and Windows) and Skitch (Mac with Windows version coming out soon). However, there does not appear to be a dedicated iOS app to take annotated iPad screenshots, which are becoming increasingly important for illustrations in blogs and tutorials. As an alternative I have developed an efficient workflow using the iPad's built-in screenshot and the apps Photogene and Dropbox.

          iPad Screenshot
          • Go to the screen you want to save as a picture on your iPad.
          • Press the On / off switch and Home button at the same time, which saves the image to the iPad's Photos Library. (As confirmation the screen will blank to white for a quick moment to simulate a camera flash effect.)
          Press On / off switch and Home button at the same time
          Use Photogene to crop and annotate the screenshot

          Photogene for iPad ($2.99) is arguably one of the best photo editors on the iPad and includes tools to rotate, adjust color, retouch, add text, and enhance with gradients, framing, and effects. During the export process you can change the resolution and then export-send the final photo to resources such as Twitter, e-mail, Facebook, Flickr, and Dropbox.
          • Start Photogene and press Edit New in the top menu bar (to the right)
          • Browse through the iPad's Camera Roll and choose your screenshot
          • Press the Crop scissors tool in the bottom menu bar and drag the round handles to choose the area you want to keep.
          • Press the Crop button in the right menu to finalize the area.
          • Next choose the Text tool in the bottom menu bar. 
          • From the right menu drag a text balloon style to your edit area. Add a text description and drag the pointer to the section you want to describe. 
          Export the annotated screenshot to your Dropbox share

          You will need to have a Dropbox website that is set up for synchronization with a Dropbox folder on your PC or Mac.   
          • Choose Export in the top menu bar (to the right). You can choose the resolution but it's best to keep the highest.
          • Press Folder and when prompted link to your Dropbox account.
          • Choose Dropbox and enter a filename. 
          • Press Folder again. If you wish, you can create subfolders within your Dropbox's Photo folder to organize exported images by category.
          • Press the Share button to save the file as a JPEG image. You can immediately insert the image from your Dropbox Photos folder to a document such as a blog post. 
          final version of a cropped iPad screenshot annotated with Photogene

          November 25, 2011

          Evaluate the Muddiest Point with Online Surveys

          The Muddiest Point

          The Minute Paper, One Sentence Summary, What's the Principle, and the Muddiest Point are popular assessment techniques that provide instructors effective feedback on what students have learned during their class. Students typically complete these assessments at the end of class. The Muddiest Point originated in 1989 from Harvard Professor of Statistics Professor Frederick Mosteller’s who asked his students to summarize key points and what more they wanted to know.  One of his students perceptively pointed out that there really wasn’t any feedback because students essentially were repeating the professor’s key points and were unable to precisely state what more they wanted to know.

          So Mosteller asked what were their muddiest (least understood) points and received many important and concrete results, which he summarized. Based on these results Mosteller would prepare special handouts to address common points of confusion that would be studied by students needing this information outside of class. Mosteller's article describing his experience with assessing student feedback is recommended reading for anyone who is interested in assessment and improving their teaching: http://isites.harvard.edu/fs/html/icb.topic771890/mosteller.html

          Mosteller had his students write down their muddiest points on pieces of paper, which were typed into a summary format and distributed. Online survey tools such as Google Forms bypass the use of paper, retyping the comments and printing handouts, thus faciliating the process of collecting, summarizing, and sharing student feedback.

          Example survey question
          Once students have submitted their feedback, the Google spreadsheet results can be shared with them as a link.  
          Reference:

          For information about Correlation Does Not Imply Causation refer to 
          http://en.wikipedia.org/wiki/Correlation_does_not_imply_causation

          Assistive Tablet Technology to Help Students Succeed

          The iPad has created a new technology space between smartphones and laptops/netbooks, providing unanticipated possibilities for teaching, learning, and accessibility. The mobility, extended battery life, and built-in accessibility features of an iPad such as VoiceOver provide opportunities for students with assistive learning needs to succeed using technology that was previously expensive, limited to a computer, and was difficult to learn and use. The "touch and gesture" interface reduces the time to master essential tools that facilitate learning and engagement. Choosing from an enormous library of apps the iPad can be transformed into assistive tools such as a video player with captions, audiobook player with text, voice recorder for recording lectures, distraction-free text reader, text-to-speech converter, speech dictation device, and sound amplifier.

          Resources:
          Poster

          Click to view larger image

          Distraction Free Reading

          You are not alone if you have struggled to keep your focus reading through articles on the web that are bombarded with still and animated...