August 14, 2010

What Can Be Done About Childhood Obesity?

The Twitter Exercise and Motivation Team is a fantastic resource that combines a dedicated blog and the clever use of the hashtag #temt to motivate hundreds of tweeps into getting fit and living healthier lives! I have been encouraged by the collaboration and kind words of support from team members, inspiring blogs, links to useful resources, and insightful tips such as this tweet from @cybraryman1: "Keep motivated to exercise by setting realistic goals & keeping an exercise journal #temt Make time to exercise in your busy schedules". BTW, you can keep track of the #temt exchange and some interesting statistics at the What Hashtag address:http://wthashtag.com/Temt .

As I read another of many disheartening articles on obesity, I thought how educators in the TEMT team could extend its collaborative model by taking steps to reduce childhood obesity through programs in schools. There is an abundance of information on obesity. For example, a Google exact search for "Obesity in America" for the past week brought up 14,300 results. The most significant findings on adult obesity were recently reported by the CDC. In brief the number of obese adults living in the United States increased by 2.4 millions in just two years (2007 to 2009) and in nine states more than 30% are obese. Flip through the pages of this Slideshare slideshow to see how the trend rapidly increased the past 25 years and in particular the increase from 5 to 9 states with rates greater than 30% for the past reporting year (2008 - 2009). The original PowerPoint is located at the CDC U.S. Obesity Trends page.
Obesity trends 2009
The news is even grimmer for children as described on the page Childhood Overweight and Obesity. All statistics stand out but perhaps this one is the most telling: "one study found that approximately 80% of children who were overweight at aged 10-15 years were obese adults at age 25 years".

So as educators and collaborators what can we do? What have some of us already accomplished in our schools or communities? One start is to share resources, ideas on how to get started, and stories of success (present or pending). I thought about steps such as having students create a healthy eating wiki as part of a class or school project. Students could learn much from such a project: collaboration to build something really useful that they can take pride and ownership in, the value of nutrition, comparing good and bad calories, family history (recipes), skills in technology (learning how to contribute to a Wiki, add comments, insert links and photos), and so on.

There is a lot of movement in taking steps to reduce the prevalence of obesity, which is encouraging. At the same time the trend is still upward and reversing it will take considerable patience and persistence. The section What Can Be Done lists educational resources for community, schools, and self: food and nutrition, physical activity, technology, success stories, and activities that provide opportunities to raise student awareness of the importance of a healthy lifestyle and empower them to to integrate physical activity as a way of life.

WHAT CAN BE DONE
RELATED LINKS

August 12, 2010

The Joy of Walking

Greetings all! I would like to share with you my personal experiences in walking for exercise and good health, enjoyment, and the thrill of accomplishment. The beauty of walking to stay fit and feel better is that most anyone can participate and the goals you set are your own.

About 6 or 7 years ago my doctor warned me of my increasing weight (borderline obese), family risk factor of heart disease, and a dangerously high cholesterol ratio (HDL to LDL). He prescribed Lipitor to manage the HDL cholesterol level but recommended regular exercise and diet to manage the other factors. That was the challenge - playing competitive basketball anymore was not an option because of repaired cartilage and aging joints, especially the knees. And I don't use treadmills in large part because I work long hours underground and can't bear the thought of missing any daylight that is left.

BENEFITS FROM WALKING
  • Manage cholesterol - extended walking will raise your LDL cholesterol but it is gradual and requires extended, regular exercise.
  • Weight control - Walking can help you lose weight but it must be done regularly and you should improve your diet at the same time.
  • Opportunities to reflect - walking can be boring for some but take advantage to reflect. Some of your most creative thinking may emerge. You may even want to take with you a voice recorder so you can capture some of your most inspiring reflections. And it's okay if people think you are talking to yourself!
  • Listen to podcasts and audiobooks, although do be careful of your surroundings. I mix days with podcasts and music or nothing at all.
  • Find where your local nature trails are and take advantage of them.
  • Take photographs and share with others
  • Walking can be social - walk with your spouse, friends, family, and neighbors
  • You can compete in walkathons for good causes and raise money.
  • Manage stress - when you improve your health and sense of well-being, then stress will naturally decrease as well.
  • There is less wear and tear on the joints. The shock factor of a runner's step is 3-4 times a person's weight but walking is usually only 1 to 1.5. Sports such as basketball and tennis can reach a SF of 6 or 7.
  • Manage asthma - Many folks with asthma report fewer attacks when they exercise regularly and I can attest to that personally. At the end of long walks I enter a "zone" in which there are no effects of asthma - exhilarating! (however, like death and taxes, it does come back.)
  • Burning calories. There is no question that running burns more calories during the same amount of time - more bang for your buck. However, many of us do not run really fast and all of us could improve our walking speed over time. For example, if you walk for 30 minutes at 4 miles per hour you will burn 165 calories. Running 5 miles during the same amount of time burns 285 calories.
  • Blood pressure - A study shows that 40 minutes of brisk walking (3 or 4 mph) will reduce blood pressure and this article explains why it works.
  • UPDATE For baby boomers genes play large role in staying healthy until 65. After that exercise & nutrition more important http://usat.ly/broX9E. In particular read the short version or the in-depth article of why walking 6- 9 miles per week appears to protect the brain against shrinkage in late adulthood.
HOW TO GET STARTED
  • Most Americans walk less than 6,000 steps per day and many much less than that. I have known of office managers who always work at their desk and can not manage more than 3,000 steps in one day. Get up from your desk often and take short walking breaks.
  • Purchase a pedometer and start calculating how much you walk. Then set goals to realistically increase your average steps per day. The recommended average is 10,000 daily steps.
  • Establish a walking route and schedule regular times to achieve your goal no matter how modest it may be.
  • Finally, I recommend purchasing quality footwear (personally I have had great luck with Nike Air Monarch) and to make sure you have plenty of toe room!

RELATED LINKS
August 11, 2010

Phone Recording Lecturecasts

Introduction

Many instructors prefer the simplicity of phoning in recordings of their lectures with a device that is familiar to them and simple to use. They do not have to worry about extra equipment and software and can bypass the multi-step process of recording with a microphone, saving the recording as a MP3 file, and then uploading the file to a podcast server. Drop.io is one of the easiest solutions to creating phone-in recordings that are almost immediately converted to podcast episodes. The first 100MB of audio lecturecasts is free, which is equivalent to approximately 400 minutes of recording time. If lecturecasts are designed for 20 minutes of delivery, then approximately 20 sessions are available. Pre-recorded lecturecasts can be uploaded separately as part of the podcast.

Getting Started
  • Go to http://drop.io and create a new drop name that is appropriate for your course and has not already been taken (e.g. mylecturesdrop).
  • Click the Create a Drop button.
  • Type your e-mail address that will be associated with your new drop and then click the Done button.
  • Log on to your e-mail account and retrieve your initial Admin password, which is sent by Drop.io.
  • Click the Settings button.
  • Enter your new Admin password and then click the Access This Drop button.
Log on prompt: https://drop.io/mylecturesdrop/login
  • Click the Access Control tab in the left sidebar and choose Admin Password.
  • Enter your new password and take note of it.
  • Click Save Settings.
  • Choose Guest Password under Access Control and enter a Guest Password for your students.
  • Click Save Settings.
  • Click the Guest Permissions tab under Settings and leave only the comment, chat, and download settings checked. These settings allow your students to subscribe to your podcast.
    If would like students to contribute to your podcast by uploading files, then check the box Guests can add. Students can also contribute if they know the phone-in number and extension or the Drop.io e-mail address.
    • Click Save Settings.
    • Click the Return link to the right.
    • Under Customize Sidebar > Voicemail click the link Create a free number that you will use to phone in your recording.
    • Dial the number and extension and when prompted record your lecture, making sure to speak distinctly. When finished simply hang up.
    • Your recording is immediately saved to your Drop with a filename such as voice-message-friday-13-aug-01-05am-gmt-mp3.
    • Click the More button to the right and choose Rename to type an appropriate name for your lecture.
    • Repeat the process as needed until you have completed your lecture series.

    Subscribe to a Dropcast (Drop.io podcast)
    • Go to your drop address (e.g. http://drop.io/mylecturesdrop)
    • Enter the Guest or Admin password as prompted.
    • Choose Share > Share Via Dropcast, which will immediately open iTunes and create a podcast with the name "sharename Dropcast" (e.g. Mylecturesdrop Dropcast).

    Security Settings

    Anyone can e-mail text, images, or audio files to your drop if they know the address, which is based on the drop name followed by @drop.io (e.g. mylecturesdrop@drop.io). Although Drop.io will automatically enter a secret key if users can only view, administrators should nevertheless enter a secret key on their own as follows:
    • Click the Settings tab.
    • Click Input/Output Settings in the left sidebar.
    • Type a combination of characters and numbers without spaces in the box to the right. If you enter "proud58mary" then the new address would be mylecturesdrop.proud58mary@drop.io
    • Click the Save Settings button.
    Note! The Account Login and Passwordboxes in the upper-right corner of your Drop.io page is only for administrators of multiple accounts and does not apply to individual drops.
    Uploading Audio Files to Your Dropcast
    • Prerecorded audio files can be uploaded in addition to your phone in recordings. Click the Add button and follow the steps in the figure below to upload your audio file, which is typically .mp3, .wav, .m4a, or .m4b.

    Composing Beat Poetry for Podcasts and Audiobooks

    Introduction

    In and of itself the sound and energy of poetry can make learning to write poems a fun, creative process. Using technology students can embellish their poetry by recording the poems they read, adding rhythmic beats, and collaborating to create their own audiobook CD and-or podcast! This post is in the form of a workshop and can be modified to meet the age of your student audience. I tried the workshop with a group of middle school students at a summer camp who rated it their favorite learning activity. Try it out on your own and have fun with your students - they will!

    Session Overview

    During this session your students will compose beat poetry with Garageband by recording their poems as a voice track, adding pre-recorded music loops, and mixing the tracks. They will send their composition to iTunes, insert artwork, add the lyrics, and label the track to identify the poem’s name, author (the student), and other related information. Once they have mixed and tagged their beat poetry they will rename the extension and then upload the file to a common Web share. The tracks in the share will be available either as a podcast or a downloadable audiobook.

    Preparation and requirements
    • Lab of Macintosh computers with built-in microphone is easier to implement, although external headsets allow students to filter out surrounding ambient sound while recording their poems.
    • Garageband and iTunes installed.
    • Shared server space for uploading audio files. Drop.io is recommend for easily sharing files and creating a podcast.
    • Students will have already written their poems, printed out and ready for reciting. An electronic file is also necessary for copying the lyrics to their poetry composition.
    • Artwork that complements their poems as .JPG or .PNG images. Students could draw with computer software, scan paintings or drawings on paper, or take photographs.
    • Handout to guide students through the workshop and use as a reference.
    Checking the Microphone Sound

    Make sure that all microphones are ready for recording.
    • Open System Preferences
    • Click the Sound icon
    • Click the Input tab
    • Make sure that Internal microphone is selected unless you are using an external microphone.
    • Make sure that the Input volume is set at least 50% (75% is shown below), which will increase the volume of your recording.

    Recording the Poem
    • Click the Garageband icon in the Dock.
    • Click New Music Project to begin.
    • Using the default settings save your project (e.g. Rattlesnakes and Roller Skates.band) to your Macintosh computer's desktop.
    • Close the Grand Piano window and Choose Track > Delete Track to remove the Piano loop.
    • Choose Track > New Track and click to choose Real Instruments.
    • In the right Track Info choose Real Instrument > Vocals > and Male or Female Basic.

    If the Track Info panel does not display, click the Info button:
    • Important! Choose Control > Metronome to remove the check.
    • Make sure that the Macintosh webcam-microphone is within recording distance (6 inches or less) to reduce ambient sound.
    • Make sure that your poem is ready to be read and the Playhead is at the beginning of your voice track.
    • Click the Start Recording button and read your poem loudly and distinctly.
    • Click the Stop Recording button to end your recording.
    • Reposition the Playhead to the track’s beginning and click the Play button.
    • Click the Play button again or press the Spacebar to stop playback. You can use either to quickly start and stop your recording or music.
    • Choose File > Save to save your changes so far.
    Adding Instrument Loops to your Poetry
    • Click to turn on the Cycle Region button and then resize the gold region bar until it matches the length of your recording.
    • Click the Show Loop Browser button
    • Press the spacebar to play your recording continuously. You can press the spacebar at any time to toggle between playing and stopping your recording.
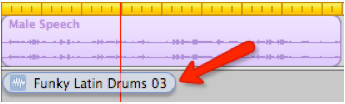
    • Choose Kits > Relaxed > Cheerful and then double-click Funky Latin D to play the loop at the same time you are listening to your poetry.
    • Experiment with different drum loops until you have the one you want for your poem.
    • Drag the loop under your recording track and at the beginning of the timeline.
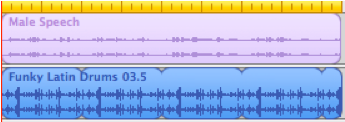
    • Release to place the loop as part of the Drum Kits track. You can drag the loop to the track’s start point if needed.
    You can loop regions so they play repeatedly and extend them to fill any amount of space in the timeline.
    • Move the pointer over the upper half of the right edge of the region. The pointer changes to a loop pointer (a vertical line and a circular arrow).
    • Drag the edge of the region as far to the right as you want it to keep playing. The region will loop repeatedly to that point.
    • Notice the “notches” that appear at the top and bottom of the region as you drag it. The notches show the beginning and end of each complete “loop” or repetition of the region.
    • Region dragged to match the length of the poetry recording.
    • Play your beat poetry with the newly added drum track!
    • Click the Reset button in the Loop browser each time you search for new loops.
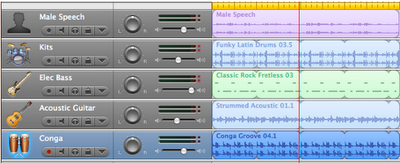
    • Repeat the process to add two or three more tracks such as: Electric Bass, Electric Guitar, and Percussion.
    Sample Beat Poetry Mix in Garageband

    Controlling volume of your tracks

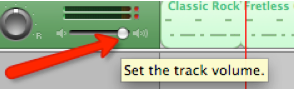
    To balance tracks during playback, drag the volume slider for each track like this as you play through your composition.

    Sending Your Beat Poetry to iTunes

    Now it’s time to send your beat poetry to iTunes and then add data that includes your poem's title, lyrics, and artwork.
    • Choose Share > Send Songs to iTunes.
    • After a initial mixdown period, iTunes automatically opens and plays your beat poetry!
    • Switch to the Garageband window (click anywhere on the window) and choose Garageband > Quit Garageband.
    • Open your poetry text file and copy the entire poem – you will paste it in another window shortly.
    • Switch back to iTunes Control-click on the poem name and choose Create AAC Version
    • Click once on your song and choose File > Get Info.
    • Click the Summary tab. Check to be sure that the Format is AAC audio file. If not, then choose the other song.
    • Fill in the blanks with information that applies to your class project. Album Artist and Album should be the same for all students to compile them into an integrated audiobook. The following labels are used in this example.
    Name = Complete poem name
    Artist = your name
    Album Artist – EC Writers
    Album = EC Writers Beat Poetry
    Composer = your name
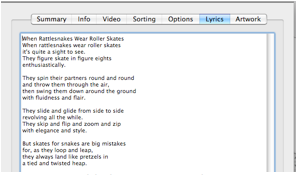
    • Click the Lyrics tab.
    • Copy and paste the text from your poem to the Lyrics window.
    Poetry text added to Lyrics window

    Adding Artwork to your iTunes Beat Poem

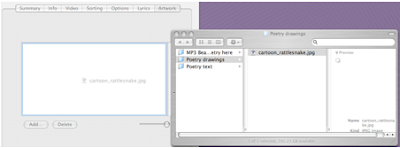
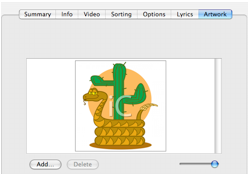
    • Click the Artwork tab.
    • Drag your image file to the Artwork window.
    • Your image should insert into the window like this:
    • Click the OK button.
    • Make sure your song is highlighted and then click the Repeat button twice so that the number 1 appears like this:
    • The Repeat button is located in the menu strip at the bottom of your iTunes window.
    • Click to play your song, which will loop until you click the Stop button.

    Image of rattlesnake in the poster was taken by Larry Page per Creative Commons license: http://www.flickr.com/photos/igboo/3520378963/

    Lyrics of poem "When Rattlesnakes Wear Rollerskates" with permission by author Ken Nesbitt.

    Share Your Beat Poetry
    • Drag your iTunes song to the Macintosh desktop.
    • Click on your poem’s title in the iTunes Music window and drag the file to the desktop.
    • Change the last character of the extension from a to b (e.g. mybeatpoem.m4a is changed to mybeatpoem.m4b). The .m4b extension will automatically organize your song as an Audiobook track when copied to iTunes.
    • Go to the web site (e.g. http://drop.io/classpoetry) and enter the guest password to access the Web share.
    • Click the Add button and follow the steps in the figure below to upload your .m4b song.

    Subscribing to a Dropcast (Drop.io podcast)

    You can subscribe to your class poetry podcast in iTunes by following these three simple steps.
    • Log on with Firefox and go to http://drop.io/classpoetry (use password).
    • Choose Share > Share Via Dropcast, which will immediately open iTunes and create a podcast with the name "sharename Dropcast" (e.g. Classpoetry Dropcast).
    • The last poem uploaded will become the first episode in the podcast.
    Creating an Audiobook

    All metadata in the podcast has been stripped so the podcast can not be converted to an audiobook. Please note that an audiobook must have a .m4b extension.
    Why Create an Audiobook?

    Easy to find among songs
    Skip while shuffling
    Cover art for audiobook
    All chapters bundled together if the same album name, facilitating organization.
    The mobile advantage.
    Artwork and lyrics
    • Log on with Firefox and go to http://drop.io/classpoetry (use password).
    • Click to download a Zip archive of all the poems by clicking the button in the right sidebar.
    • Unzip the archive, which will create a folder named classpoetry with all the .mb4 audio files inside.
    • Start iTunes and choose Preferences > General and check Books or Audiobooks to ensure that the category is displayed under iTunes Library along with Music, Movies, ...
    • Drag the .m4b files in classpoetry folder to iTunes open window. All files will display in Books or Audiobooks category.
    • The first file copied is the cover art for the audiobook. Files can be sorted with the sort feature.

    July 05, 2010

    Two Months in Quick Thoughts on My iPad

    Quick Thoughts on the iPad

    I have spent two months with my new iPad and can say that the experience has been superb with even more expectations as clever apps continue to be designed by inventive people (refer to related links at the end of this post for examples of innovative, unexpected uses of the iPad). I have used the iPad at work, at home (everywhere except ...), outdoors, in coffee shops, and at conferences. Below are quick thoughts categorized under what I really like, what needs improvement, and disappointments (so far). In the beginning I missed having the convenience, typing angle, and protection of the Apple iPad case, which arrived as a backorder one month later. If the iPad in some future version becomes a possible laptop replacement, then I might consider using a keyboard.

    What I Really Like
    • Magic comes to mind when tilting, rotating, and touching the iPad. One should not underestimate the attraction of elegant design, near instant responsiveness, and attention to detail. A quibble - the volume control button could be easier to adjust.
    • Sure it's obvious but often not stressed enough how important instant access to information can be not only for the techno-savvy and impatient but also for people unnerved by technology in general - immediate feedback is important. For example, NPR Music online takes several clicks and fussing with browser windows before your are ready to play and switch between programs. On an iPad it's a couple of swipes and presses. NPR Music is one cool app.
    • The USAToday Reader is one of my favorite iPod touch apps and it is fantastic on the iPad. I can quickly look up the weather, news, scores, and share articles by e-mail, Twitter, and Facebook. The design is beautiful, evidenced at its best with Day in Pictures, information is easily retrieved, and yes it is free.
    • I am not bothered by the lack of multitasking and in fact would argue that less distraction is an advantage when reading, listening, and taking notes. Read this interesting article Understanding Multi-tasking on the iPad: What is it really? Exception: Apple apps such as iPod can play music in the background but 3rd-party apps such as Pandora and RadioTime cannot. The iOS 4 upgrade for iPad when released in late Fall should address this issue.
    • Dropbox is an essential app, which is available as a share when your iPad is connected to a wireless network. Dropbox displays iPad compatible file formats (e.g. images, music, Office and iWork documents, rtf, and html) stored on your share and provides tools to open them into apps such as GoodReader, Keynote, and Pages.
    • One of the reasons I purchased an iPad was to read rich content PDF's such as the Horizon Report, Educause publications, The Amazing Web 2.0 Projects book, and the Pew Report. Although the newly updated iBooks app can now handle PDF's, GoodReader is the best available document reader and recently added displaying double-pages, horizontal page-turning, and VGA output.
    • Keynote for iPad easily and quite accurately imports PowerPoint (Windows or Macintosh) and Keynote (Macintosh) presentations, especially when used with the Dropbox app. From your PC or Mac save your PowerPoint or Keynote presentation to a Dropbox folder (e.g. presentations), open Dropbox on iPad, load the presentation, and choose Open In Keynote, which automatically imports the file. The optional iPad VGA adapter allows you to project your Keynote presentation, although it must be in play mode.
    • With Netflix for iPad subscribers have essentially the same functionality as the full web browser version (manage your NetFlix DVD and Instant queues, view Recent activity such as when your next DVD's will ship, etc.) and can instantly watch TV episodes and movies streamed from Netflix on their iPad in full screen. The quality is excellent and the experience is superb.
    • Finally! The new version of iBooks adds a note taker to its built-in dictionary, search, bookmarking, and multi-color highlighting tools. The bookmark index can be synchronized with the same books on your iPhone or iPod touch running iOS 4. I am currently reading The Heart of Darkness and taking advantage of these features.
    • It’s a social device! It's rare to pass around a laptop or netbook for sharing such as browsing photo slideshows and listening to music but an iPad, yes. Think social and collaboration when using apps such as SonicPics for Creating Collaborative Audio Slideshows.
    • With the excellent built-in speakers, the iPad is the best multipurpose, portable music player ever! You can play iPod music, NPR Music, Pandora mixes, RadioTime radio stations, and much more! The experience is fantastic.
    Needs Improvement
    • The Dock Connector to VGA adapter works with Keynote presentations in play mode, iPhoto slideshows, and iTunes movies that are not protected. There is no audio output. Read a C- review by iLounge. I would put this in the Disappointments list but find it useful for Keynote presentations and am optimistic that more apps such as GoodReader will support VGA output.
    • I used Pages to take notes during a conference and the process was cumbersome. An efficient note taker that includes a built-in web browser for bookmarking would be better. I am also considering using NoteTaker HD with a Pogo stylus.
    Disappointments
    • Apple did not include its built-in iPhone apps Weather, Clock, and Voice Memos. They are simple, fast, run in the background, and free. For example, it is not possible to set a third-party alarm unless the app is running, which renders it near useless. The lack of Apple's Voice Memos is especially disappointing because no app can match its feature set: simple, elegant design; .m4a compressed file format; built-in trimmer; background recording; and iTunes file conversion. The $1.98 Voice Memos app by Kenditech comes close but does not support backround recording and does not include a trim editor.
    • Apple does not support enhanced-chapter podcasts (.m4a format) on iPad by design. The full audio of an enhanced podcast plays, but only first the slide displays. This is a setback because enhanced podcasts, which are essentially slideshows played in sync with audio recordings have signficant potential for learning, especially when played on a larger screen such as an iPad. I have submitted feedback to Apple hoping that a change will be made in the future.
    Related Links

    May 30, 2010

    Creating Collaborative Audio Slideshows

    Creating Collaborative Audio Slideshows

    One month ago I received my new iPad and immediately scoured the App Store for interesting free or low-cost apps. I downloaded the usual arsenal: GoodReader, iBooks, Twitter client (Twitterific), Amazon Kindle, and USA Today. Then I happened on SonicPics, which I discovered in my search to determine why enhanced (chapter) podcasts do not correctly display on an iPad. (I have reported this issue to Apple.)

    Computer software provide tools to create audio slideshows typcially requires several steps: organizing the images, setting up a microphone, narrating while the slides displays, exporting the file, and then finally publishing it to a web site. The process is cumbersome and portability is limited. In contrast SonicPics for iPod touch, iPhone, and iPad (although not yet native) is an elegantly simple, all-in-one mobile solution for creating audio slideshows — still images synced with audio as they relate to each image — that provide enhanced online and mobile learning opportunties for students as compared to audio only media. The slideshows can be exported as QuickTime chapter videos or uploaded directly to YouTube for instant sharing! SonicPics requires a microphone and imports images from your iPhone, iPod touch, or iPad's Photo library.

    Tip: There are a number of iPod touch microphones available, varying in quality and price - some up to $40 each. I have tried these low-cost mics with good success. For under $5.00 on Amazon the Mini Capsule Microphone is of surprisingly high quality, although it is really small and easy to misplace.

    Even though the app is not yet native, SonicPics runs without issue on an iPad, which is a natural for annotating audio to images because of its larger screen and built-in microphone. In addition the iPad Camera Connection Kit allows direct transfer of photographs from a digital camera to an iPad Photo library. Consider these uses to assist with your personal recording, notetaking, and tour guides:
    • Lecture recording - Use a set of related images or export a series of JPEG's from a PowerPoint or Keynote export and record notes as you touch drag through each image.
    • Conference notes - Take photographs during the conference and then record your notes and reflections.
    • Photo tours - take photographs of tours such as hiking and then record your experiences as they relate to each photograph.
    The Real Excitement: Collaboration!

    I look forward to creating audio slideshows on my own for instruction, sharing experiences, and exploring new ways for engaging learners. However, imagine the possibilities when audio slideshows are created in collaboration, especially on an iPad. Students can create group recordings by touch dragging through images, recording their reflections either spontaneously or by reading from prepared text, and passing the iPad on to the next person. Projects can can be uploaded to YouTube for sharing or exported as an.m4v chapter video, which can be played standalone in QuickTime or Windows Media Player or embedded in a web page. Can you add to this sampling of project ideas?
    • Tours or field trips - students take photographs, which are uploaded to the iPod touch or iPad using Apple's Camera Connection Kit.
    • Create audiobooks - students create their own digital image (photograph, drawing, scan, downloaded file) and then upload them to a Drop.io or Dropbox share. Using Dropbox or Droppler app upload the images from the share directly to an iPhone, touch, or iPad Photo library. Students can record poetry or sing songs as they relate to each image.
    • Language instruction - Using the same scenario as an audiobook expect that students record in a foreign language that they are studying.
    • Digital Story Telling - Students take their own photographs and then record a story, slide by slide.
    In the recent time that I have been using an iPad, I would say that SonicPics has been unexpectedly one of my favorite and most useful apps. I wait in anticipation for the iPad native version.

    Improving SonicPics

    I have written to the publisher of SonicPics with the following recommendations:
    • Create an iPad native app, which would improve the interface, add new features such as App sharing and of course improve the resolution.
    • Provide an option to export slideshows as enhanced podcasts so they can be played back on a mobile device.
    Currently iPhone OS 3 does not allow third party apps such as SonicPics to directly transfer media content to iTunes, which would eliminate the currently cumbersome process of file export, Wi-Fi sharing, entering a URL, downloading, and copying to iTunes.

    SonicPics Tutorial

    May 20, 2010

    E-Portfolios with Google Sites EDU

    It has been generally acknowledged that e-portfolios are primarily developed for ongoing learning, showcase, and assessment and that one e-portfolio system does not fit all purposes. Full abstract below slide presentation ...

    Abstract

    It has been generally acknowledged that e-portfolios are primarily developed for ongoing learning, showcase, and assessment and that one e-portfolio system does not fit all purposes. If we are interested in the academic success and co-curricular accomplishments of our students through self-motivation, engagement, reflection, and ownership, then a learning portfolio nurtured over time has significant potential in being developed for life after graduation.

    There are many e-portfolio tools and systems available, none of which provides the perfect solution to all institutional assessment and student learning needs. Google Sites for Education has only recently been considered for portfolio development but offers promising solutions to effectively build learning and showcase portfolios including artifact storage, privacy control, collaboration, reflection, and ownership. Although orientation, training, and ongoing support is strongly recommended, Google Sites is easy-to-use and provides built-in tools to insert evidence of extended learning from sources such as social media sites.


    SUNY CIT 2010: E-portfolios for Learning – Google Sites for Education
    Where: SUNY Plattsburgh, Yokum 201
    When: Friday, May 28 9:15- 9:45 am

    Distraction Free Reading

    You are not alone if you have struggled to keep your focus reading through articles on the web that are bombarded with still and animated...